One of my favorite project has been to build a home wine cellar. In 2002, I moved into a house that cried out for some basement refinishing. One of its many nooks was a perfect match for a small cellar.
I took a bunch of pictures throughout the 1+ year construction project. (Yeah, I know, that's a long time. It was being done in my spare time.) The inside dimensions are 101 in. x 66 in. with a racking capacity of 886 bottles.
I'm still doing some finishing touches with lighting, trim molding, and a small water feature. In the interim, here's what it looks like.
Insulation and Vapor Barrier
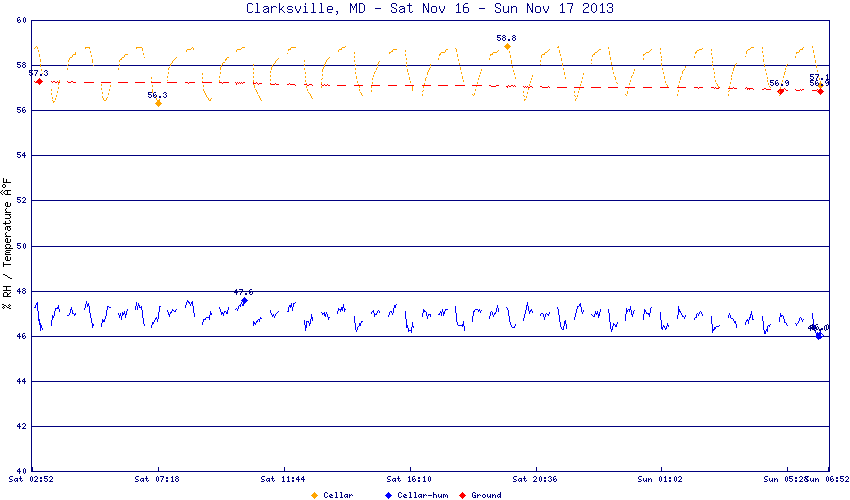
Two key issues in constructing a good cellar is adequate insulation and a proper vapor barrier. Insulation prevents the room from absorbing heat too quickly. It will always transfer heat (remember that class in thermodynamics). It is just a matter of reducing it to an acceptable point. The vapor barrier is key to keeping the moisture inside the cellar and preventing it from getting out of the room. Since moisture is something that mold and bugs need to live, you really don't want to give them a reason to live in your walls. I chose a sprayed on foam insulation for my vapor barrier. Its an excellent vapor barrier and a lot of fun to install!! Check out the Tyvek suit in the pictures.
Walls and Floors
I built the walls out of 2x4s and 2x6s. I used the 2x4s on the exterior walls and the 2x6s on the interior facing walls. On top of the framing, I used moisture resistant drywall. It installs the same as regular dry wall and gives a little bit more protection. I finished the walls with a couple of coats of primer and a few coats of enamel paint. I wasn't happy with the paint finish, but since it was going to be behind the racking, I decided to let it go.
I also installed a ceramic tile floor to give it a rustic character. The space seemed too small for an inlay, so I settled on angling the tiles to give it some flare.
Racking
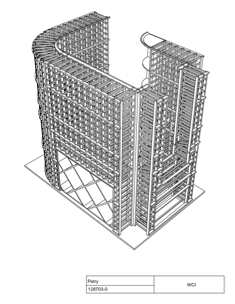
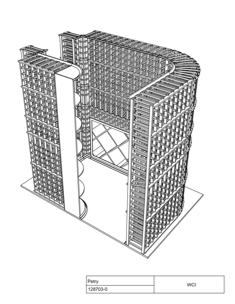
In parallel to the floor and walls, I was working on the racking. Given the detail and complexity, I enlisted Wine Cellar Innovations (WCI) for the racking design and wood. I decided on a custom design in order to fully utilize the floor to ceiling height with racking. Most component system that I had seen assembled to about six foot of height. I wanted to use that extra two feet for more bottles;-)
WCI did a great job of taking my rough ideas and turning them into a custom racking design. After a couple of small tweaks to handle clearance of the door moldings, they cut the wood and sent it out. All the wood came on a single pallet with each section individually boxed and packages. It was like getting a grown-up version of Lincoln Logs complete with assembly instructions. Assembly was very smooth and easy. The trick was knowing which section to build and install first. Since the racks fit floor to ceiling, most of the assembly was done inside the cellar. The made things a bit tight at times, as sections had to be moved around each other.
Tools
One item that was invaluable during all this was an air nailer. I have a small electric Porter-Cable compressor that I use to drive my nailers. It can get a bit noisy at times, but I can't image trying to do the assembly without one. Not only does it make it easier, but it also provides a clean finish with no hammer marks.
Cooling Unit
I went with a stand-alone WhisperKool 4200 unit installed in the far wall. It is noisier than I expected. I had hoped for the low rumble of a refrigerator, but instead have the noise of a window mounted air conditioner. The 4200 is rated at 4200 BTU (about 1/3 of a ton of A/C).